Posts Tagged ‘Invitations’
Halloween Party Invitations with the Cricut
I finally finished my Halloween party invitations…they were some work, but I think well worth the effort. Using my Cricut Expression with the Fabulous Finds and Storybook cartridge, I created this great looking 3 fold out invitation, with the details of the party hidden behind these great little doors.
See below for more details.
 Halloween Party Invitations
Here are some basic steps to how I created these:
1. Use the Cricut and the Fabulous Finds cartrige. Cut a gray or black bazzil cardstock <trialbm2> at 6″
2. Cut <trialbm2> at 6″ with blackout option from Halloween print paper (I used Making Memories Spook Alley collection). This year the paper collection is double sided so you can use that duel sides to save some time.
3. I cut 3 <trialbm2> at 6″ from various Halloween print paper with the inserts option.
4. The Halloween print cutout is your backing, adhere the 3 different inserts to the wrong-side of the Halloween paper.
5. Print the location of “where” you are going to have the party on a small strip of vellum and adhere on top of the left most insert.
6. Print the location of “When” you are going to have the party on a small strip of vellum and adhere to the middle insert in a centered location so when you place the solid cardstock over you can view it through the “window”.
7. The “RSVP” information gets placed in the same fashion as “When” but in the bottom centered location.
8. The right most insert should just have an embellishment element that fits the “Beware” theme. I just used a variety puffy vampire, witches or bats.
9.Adhere the plain cardstock on top of the 3 inserts.
10. Cut a 1″ strip of paper from Halloween paper and glue that to the top of the solid cardstock. Use scissors to trim the strip around the top.
11. Storybook <crnrSwrl> with Accent/Frame option and cut at 2.5″ from black cardstock to create the accent on the left most window.
12. Storybook <crnrSwrl> with Fancy/Corner option and cut 2.25″ from black cardstock to create the accent of the right most window.
13. Fabulous Finds <tab6> at 1″ and cut out 4 tabs from the maroon paper for each invitation (these were really tricky – if you can think of a better way to put the labels on – I advise this is the area to be more simple and save yourself some time.
14. I printed the text “Where”, “When”, “RSVP” and “Beware” repeated on green paper then used Fabulous Find <tab6> at 1″ with the insert option and used the center point option to align the blade in the center of the text.
15. Adhere the inserts to the back of doors of each section. Fold them over. Align and ahere the inserts. Then close the tabs and adhere.
16. I used Making Memories spook alley embellishments to embellish each tab.
17. Use a embosser tool to fold each section properly.
18. Add an embellishment to cover each hole that is on the backside of your invite (mine are from the Making Memories Spook Alley)
18. Wrap with raffia or twine.
19. Use another embellishment to tie of your work of art 🙂
20. Feel free to ask any other questions…enjoy!
Spooky Halloween Birthday Parties, Invites, Cakes and More!
I love it that my daughter’s birthday is in the early part of October, we get to celebrate Halloween all month. This post is dedicated to Halloween Birthday’s. I would love to see your creations and ideas, as I expect that I will need new inspiration each year!
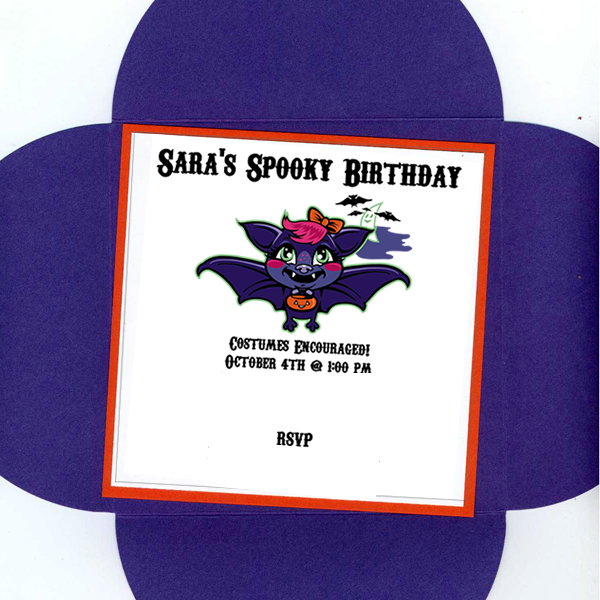
Last year, I built the Spooky Halloween Birthday theme around this great batty girl image that I found on istockphoto.com. My daughter absolutely loved this bat girl vector art, and we used it as the catalyst for her party. The invites were a square format and I used Paper Source’s – Petal Envelope in grape (upon checking the link I found out they are on sale – 50% off!), then I mounted the white square invite on Paper Sources poppy 5×5 notecard (also on sale!). I used Martha Stewart’s black sticker that read “Beware” to close up the invite, and Paper Source’s poppy file folder labels for the name’s and addresses. The font I used is Carnivalee Freekshow. I scanned in the invite below, the colors aren’t quite true…but if you use the links that I have included in this post you will get stunning results and the “ah” factor when your guests open it.

That day we actually had two birthday parties, the kids one first and the adult later. For the kid’s Halloween Birthday Party I had my bakery: Its All About the Cake in Dana Point CA, make cupcakes with white icing and black and purple bats cutout of fondant. The evening cake was one of Diane’s masterfully designed cakes, she is truly an artist.

I scrapped this invite together 4 years ago. Once I scrapped the one invite, I scanned it. Once the image was scanned, I bumped up the contrast and the saturation, to get the blacks, really black and the other colors to be intense. Then I just printed them to 4×6 glossy photo cards, and used black envelops.

Halloween Birthday Invite
